Managing Opportunities, Demos and Follow-Ups
Opportunities represent potential sales for your company. Every Opportunity is associated with a Contact, and newly-generated Opportunities should be actioned as soon as possible to increase the likelihood of scheduling a Demo for the Sales team. Learn more about managing Opportunities and Demos below.
Managing an Opportunity
1. When a new Opportunity is created in 1Stop, you'll find it in the relevant Custom View of the Opportunities module. It will either be found in the "1a. New Incoming" view if it was created automatically, or the "1b. Manually Added" if it was entered manually.
2. To access an Opportunity, cilck on the Opportunity Name with the associated record.
3. Upon reaching out to the Contact associated with the Opportunity, select the relevant Transition button from the below, and simply follow the prompts. We'll go into more detail on how to Gather Demo Info in the section that follows.
- Gather Demo Info: Contact is interested in scheduling a Demo
- No Response: you were unable to reach the Contact, select to move them to the appropriate Custom View
- Contact in Future: select to move the Opportunity back to "1a. New Incoming" at a specific date and time in the future
- Close Opportunity: Contact is not interested in scheduling a Demo
- Junk: Opportunity was not a valid Opportunity
- Request Revenue Service: Contact requires a Service visit, select to create an Operations Schedule record for the appropriate team
Gathering Demo Info
1. After reaching a Contact that is interested in scheduling a Demo, select the "Gather Demo Info" Transition button.
2. You will now enter a Kiosk, or a series of questions that walk you through the questions to ask the Contact prior to scheduling the Demo. Initially the questions focus on details about the property. All Kiosk questions are customizable based on your specific needs.
3. Continue through the Property Details questions, answering as many as possible, with those marked in red being mandatory. Click the appropriate blue button at the bottom of each window to proceed.
4. After gathering information on the property, we then move to Product specific questions, if your company supports multiple projects.
5. Each Product features its own specific questions, meant to capture as much information for the Sales Rep as possible.
6. Regardless of the Product, the last question in the Kiosk will be used to develop a rough estimate of the size of the job, to assist in scheduling the Demo.
7. After completing all of the questions in the Kiosk, you'll be returned to the Opportunity, where all of the answers to the questions will be populated in the appropriate fields, and you may add any additional answers to fields not included in the Kiosk questions.

About Lead Quality Score
This field takes all of the the information gathered and assigns a score based on a scale of 1-100 to indicate the potential value of the Lead, as outlined below. Questions/answers and point values are all customizable, based on your needs.
9. After completing all of the questions, your Opportunity is in the "Demo Ready" State. Select the appropriate Transition to continue:
- Set Demo Time: the Opportunity is valid and ready for a Sales Rep to meet the Contact
- Close Opportunity: the Opportunity is not valid
- Contact in Future: the Contact wishes for someone to call them back later to schedule the Demo
Setting a Demo or Follow-Up
1. 1Stop's Sales Scheduler makes it easy to Set and edit all of your Demos and Follow-Ups, providing a comprehensive look at all of your Sales Teams' meetings in one convenient daily view. After you have Gathered Demo Info for the Opportunity, click "Set Demo Time". Note that after a Sales Rep has meet with a Contact, if they require a Follow-Up meeting, you will follow the same procedure outlined below, but start by clicking the available "Set Follow-Up Time" Transition (not pictured below).
2. Doing so will launch the Sales Scheduler widget, pre-filtered to tomorrow's date and with only those Sales Reps that sell the Product associated with the Opportunity. The Rep Score is sorted in decreasing value, so your best Sales Reps will be listed at the top. Any Sales Meetings or Sales Reps with time off will appear, so you know exactly which reps are available, and when.
3. To Set the Demo time, simply click on any open square associated with the Sales Rep and time that you wish the Demo to begin. We'll use Meredith Davis at 2:30pm in our example below. Note that if you do not have any open times for a specific Sales Rep, you may utilize one of the available Overbooking rows, and later modify the Demo to an actual Sales Rep.
4. Doing so will open a window that combines the Sales Rep and Demo Start Time selected with details from the Opportunity. Note that the Name of the Demo is Product-Meeting Type-Contact Name-City-Lead Score-Job Size. Confirm that the Sales Rep, Start Date & Time are correct, make any necessary adjustments to the Duration, and click "Save".
5. Upon saving, the Sales Scheduler will be visible again, and the Demo you just Set will appear. Note that its orange in color, indicating that it is in Set State. Click Close to return to the Opportunity.
6. Returning to the Opportunity, you will notice that the Current State has moved from Demo Ready to Demo Set, and the Opportunity now has a Sales Schedule record associated with it.
7. Clicking on Sales Schedule in the Related List or scrolling down the page will allow you to review the details of the Demo you just set, including a link to the Sales Event record, Schedule Status (Active or Canceled), Sales Rep, Meeting Type (Demo or Follow-Up), Meeting Start Time and End Time, and Product.
8. Your now have additional options for the Opportunity, as highlighted below and outlined in further sections:
- Confirm Demo: generally done the day prior to the Demo
- Modify Demo Time: change the time of the Demo within the same day
- Modify Demo Date: change the date of the Demo
- Cancel - Back to New Incoming: cancel the Demo and move the Opportunity back to New Incoming
- Cancel - Contact in Future: cancel the Demo and pick a time in the future to reach out to the Contact
- Cancel - Close Opportunity: cancel the Demo and close the Opportunity
Confirming a Demo or Follow-Up
1. Confirming a Demo or Follow-Up is a straight-forward process. Simply click the "Confirm Demo" (or "Confirm Follow-Up) Transition button.
2. Next click "Save" on the Confirm Demo/Follow-Up pop-up.
3. Upon Confirming a Demo/Follow-Up, the Opportunity State will update to Demo/Follow-Up Confirmed and you will have two additional Transition buttons - "Issue Demo" and "Back to Set". "Back to Set" simply moves the Demo one step back in the process to Set, in case it was accidentally Confirmed. Issuing Demos and Follow-Ups can be done in one of two ways, outlined in the next Section.
Modifying a Demo/Follow-Up to a New Date
1. To modify the date of a Demo or Follow-Up, navigate to the associated Opportunity and click the "Modify Demo Date" or "Modify Follow-Up" Transition button.
2. Select the reason for moving the Demo/Follow-Up, add any relevant Notes, and click "Save". The Demo/Follow-Up will move back to the "2a. To Be Scheduled" Custom View on the Opportunities Module.
Modifying a Single Demo/Follow-Up on the Same Date
1. To modify the time of a Demo/Follow-Up, navigate to the associated Opportunity and click the "Modify Demo Time" or "Modify Follow-Up Time" Transition button.
2. Doing so will launch the Sales Scheduler widget, with the Demo/Follow-Up for the associated Opportunity indicated with a blue vertical bar at the beginning of the Demo/Follow-Up.
3. You may modify the time and the Sales Rep via one of two methods (note for a Follow-Up, you may only modify the time). The first option is to click and hold the mouse button in the first 30-minute time block of the Demo/Follow-Up, and drag the meeting to a new time or Sales Rep, as seen below. Let go of the mouse button at the time and on the Sales Rep where you want the Demo/Follow-Up to move to. Note that if doing so creates a Conflict with another meeting, the Demo/Follow-Up will move back to its original time and Sales Rep. In the example below, we would need to remove Meredith Davis from the 10am Sales Meeting in order to schedule this Demo to begin at 9am.
4. The second option is to click anywhere within the Demo/Follow-Up and the pop-up below will open, where you may then adjust the time or Sales Rep. In this example, we'll attempt to update the Demo Start Time from 2:30pm to 1:30pm, which like the case above, will create a Conflict with the existing Sales Meeting.
4. Due to the Conflict, when clicking "Save" we are prompted with a warning message, so we must either select a time that does not overlap with an existing meeting, or remove Meredith from the Sales Meeting.
5. In the event with either of the methods above you move the Demo/Follow-Up to a time and Sales Rep where there is no Conflict, it will appropriately move to the available space on the Sales Scheduler widget, as we have done below using one of the Overbooking available spaces.
6. Clicking the red "Close" button in the top right corner of the Sales Scheduler widget will return you to the Opportunity. Note the associated Sales Event record is reflecting the new Meeting Start and End Time, as well as the fact that the Demo is currently an Overbooking.
Modifying Multiple Demos/Follow-Ups on the Same Date
Using the Sales Scheduler Module, users can quickly see a daily view of all Demos, Follow-Ups, Sales Meetings and Sales Rep Off time. This view is especially helpful for the individual responsible for Issuing all Demos to Sales Reps, to ensure first that the schedule is optimized.
1. Navigate to the Sales Scheduler in the top menu, or search using the "...". Note below that one Demo is Confirmed, indicated by the yellow color, while the other - shaded in orange - is Set. Sales Reps on the Sales Scheduler are shown in descending Rep Score rank, ensuring the best performing Sales Reps are at the top.
2. Taking a closer look at our Demos, we can see that the Demo currently assigned to Adam North has a Lead Score of 70, and this Windows job is for 10-14 openings. While the Demo that is currently in an Overbooking has a lower Lead Score of 65, and fewer openings with only 5-9.
3. Prior to Issuing either Demo, we want to optimize the highest value Opportunities to the best Sales Reps, so we are going to move the Haley Dominguez Demo to Sales Rep 1Stop Admin, and the Alice Clark Demo to Meredith Davis. You can move Demos using one of two methods, outlined here. Clicking anywhere in a Demo will open a pop-up window, that allows you to change the Sales Rep, Start Time and Duration. Here we will move the higher-value Opportunity from Adam North to 1Stop Admin, and click Save.
4. When the Sales Scheduler refreshes, notice that the Demo has moved from Sales Rep Adam North to 1Stop Admin. In the next step we will now use the second method of modifying a Demo to move the Alice Clark Demo from its current Overbooking spot to Meredith Davis.
5. To drag-and-drop the Alice Clark Demo to Meredith Davis, simply click and hold your mouse in the first 30-minute increment of the Demo and drag it up to begin at the same 3:30pm time slot, but for Sales Rep Meredith Davis instead.
6. Once you let go of the mouse, the Demo will update to its new Sales Rep, and the process is complete.
Issuing a Demo/Follow-Up
1. Demos and Follow-Ups do not appear as Meetings on the Sales Rep's calendar until they are Issued. To Issue a single Demo/Follow-Up, simply navigate to the Opportunity and click the "Issue Demo" or "Issue Follow-Up" Transition button on the Opportunity. Sales Reps will receive instant notification that a new Demo/Follow-Up has been assigned to them. Most users will prefer Issuing all of the next day's Demos/Follow-Ups at the same time, as outlined in the following steps.
2. Navigate to the Sales Scheduler, which you will find either in the main menu bar or by clicking the "..." and searching for it. Upon opening the Sales Scheduler, it will default to tomorrow's date. You may then filter using any of the menus on the top of the screen if desired.
3. After ensuring that all Confirmed Demos are associated with the correct Sales Reps, simply click the blue "Select All" box and then the green "Issue" to Issue them all. Alternatively, you may check the box of individual Demos/Follow-Ups you would like to Issue and click the green "Issue" button to Issue the selected Demos/Follow-Ups. Note that Demos that are still with an Overbooking row may not be Issued until you assign them to an actual Sales Rep.
Adding a Second Sales Rep to a Demo/Follow-Up
1. To add a Second Sales Rep to a Demo or Follow-Up, it must first be Issued. Once Issued, the "Sales Rep 2" field will become visible on the Opportunity.
2. Select the Sales Rep that will be running the Demo or Follow-Up with the initial Sales Rep.
3. A second Sales Event record will appear in the Related List and on the Sales Scheduler.
Canceling a Demo
1. To Cancel a Demo, select the appropriate option as outlined below:
- Cancel - Back to New Incoming: select this option if you are unable to reach the homeowner to Confirm the Demo, or if when the Sales Rep arrives at the Demo, the homeowner is not there. Clicking this Transition will cancel the Demo and immediately move the Opportunity back to New Incoming
- Cancel - Contact in Future: select this option if at any point the homeowner asks to cancel the Demo and to be contacted later at a specific date and time. Choosing this option will cancel the Demo and allow you to choose a date and time that you want the Opportunity to appear back in New Incoming. serving as a reminder to contact the homeowner at that time.
- Cancel - Close Opportunity: select this option to cancel the Demo if the homeowner wishes to not be contacted again. The Demo will be canceled and the Opportunity will be moved to Closed State.
2. Depending on what State the Demo is in at the time of canceling (Set, Confirmed or Issued) you may be asked to indicate if the Sales Rep has already arrived. Choose Yes or No if prompted, then click Next.
3. On the next step, choose the most appropriate reason for the cancelation and click Next.
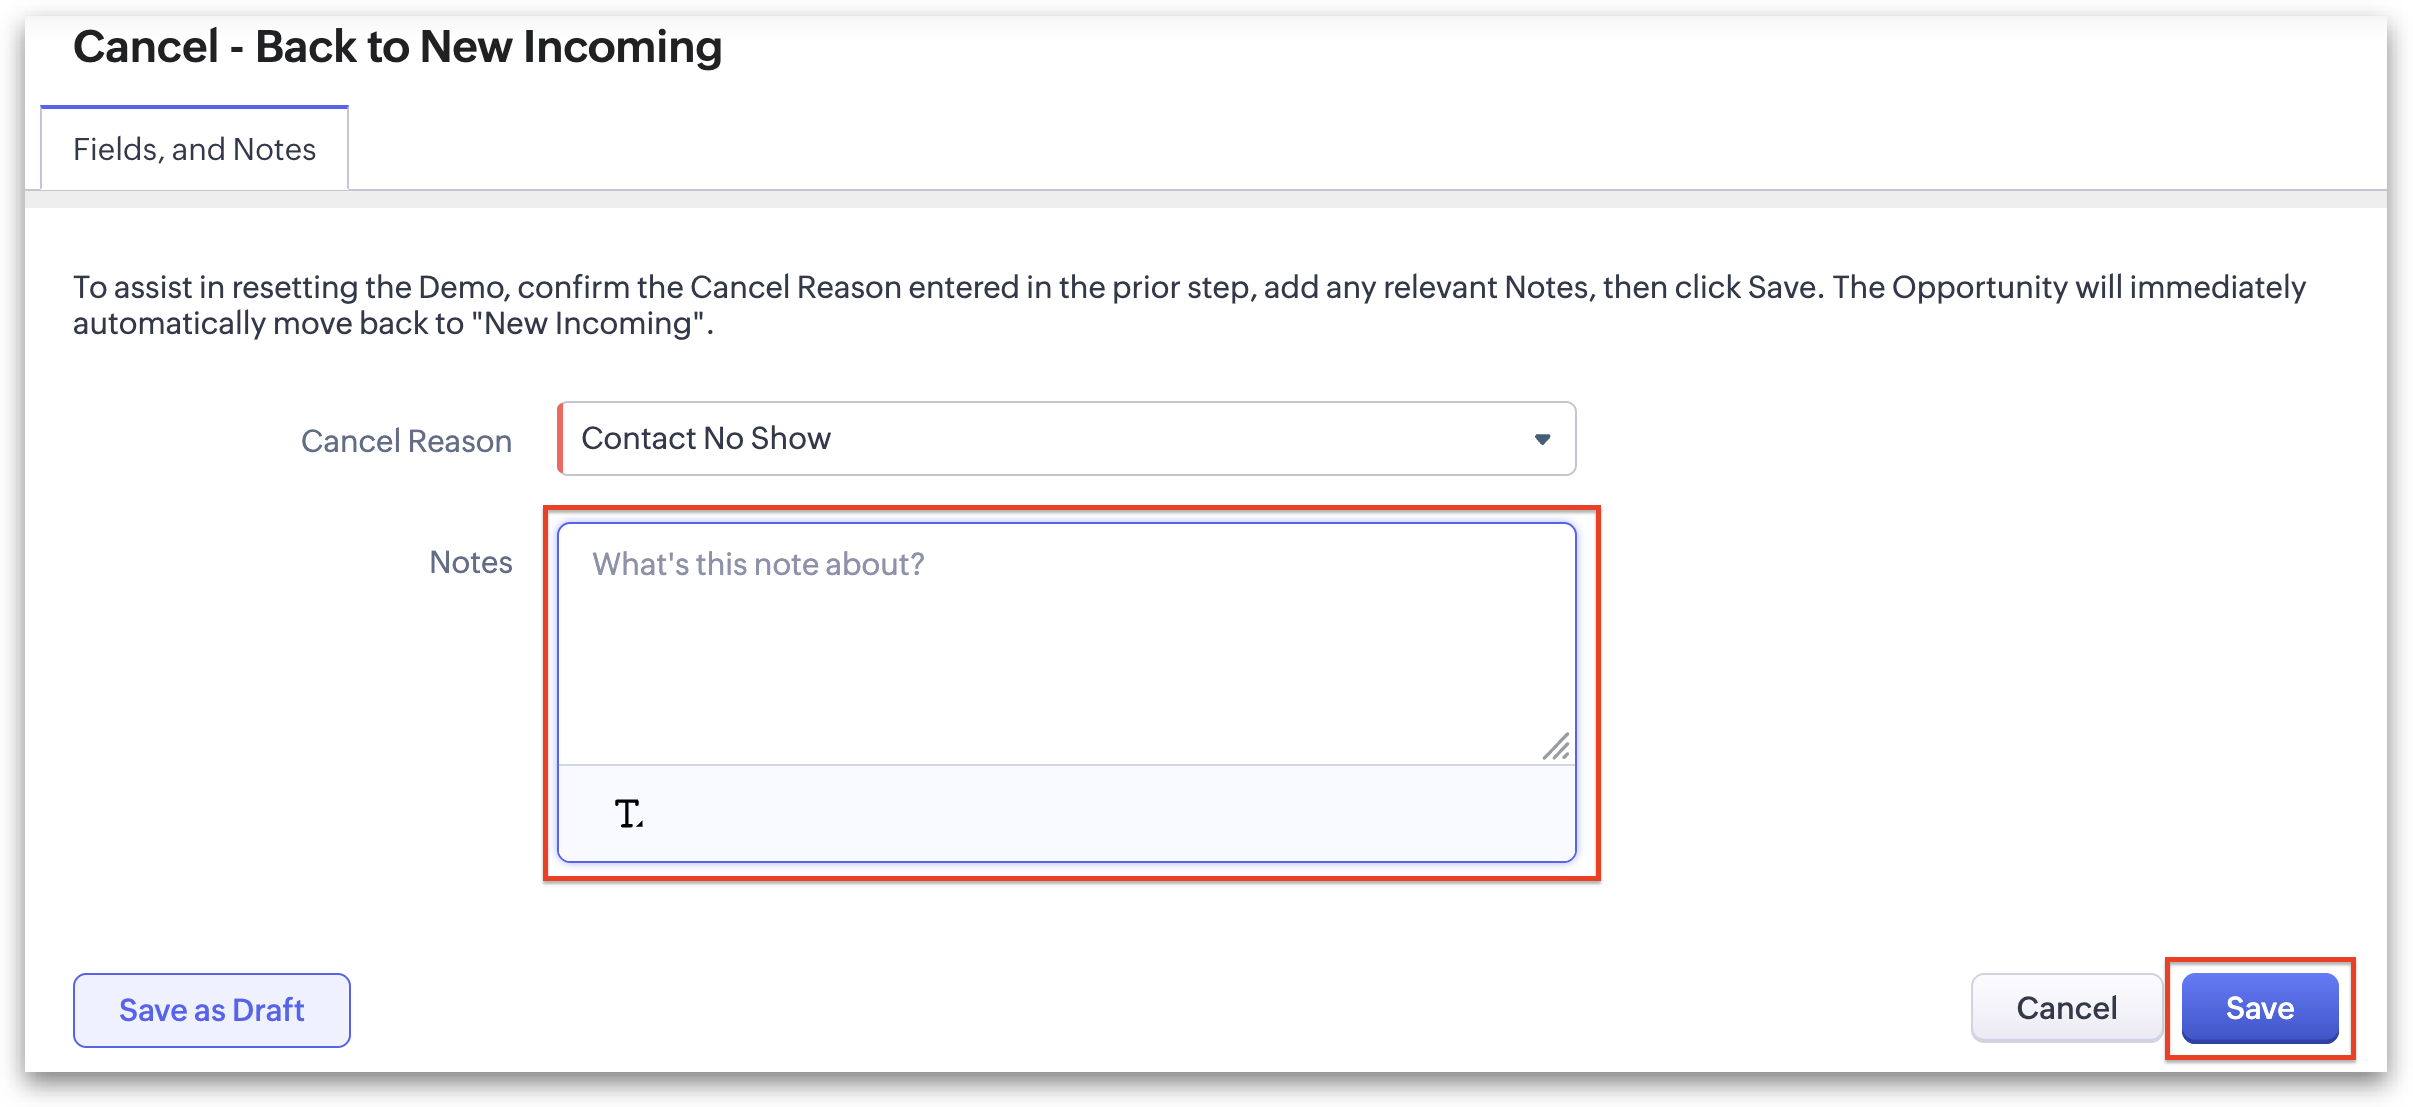
4. Finally confirm your Cancel Reason is correct, add any relevant notes for why the Demo was canceled, and click Save.
Related Articles
Managing Leads, Opportunities, Demos and Follow-Ups
Leads represent potential sales opportunities for your company. Newly generated Leads should be followed up on as soon as possible to increase the likelihood of scheduling a Demo for the Sales team. Learn more about managing Leads and Demos below. ...Introduction for Scheduling Teams
1Stop intuitive lead management and appointment setting process saves you time and helps you book more appointments by: Keeping all of your leads organized by status in one place, ensuring no one slips through the cracks. Making setting, assigning, ...Creating Contacts and Opportunities
Contacts and Opportunities are the heart of 1Stop, and represent the first step in the appointment setting process. Contacts are individuals, and therefore should never have a duplicate. Opportunities are leads, or potential projects, and as a ...Anatomy of the Sales Scheduler
The Sales Scheduler is the epicenter of organization for the Scheduling Team. An overview is below, with more in-depth explanation in the individual articles of the Scheduling Teams section. Date: Displays the date user is currently viewing, which ...Signals
Introduction In 1Stop Install CRM, Signals are real-time alerts that inform you about interactions with your leads, contacts, or potential customers. They help you monitor customer engagement across communication channels and take immediate action in ...