Managing Leads, Opportunities, Demos and Follow-Ups
Leads represent potential sales opportunities for your company. Newly generated Leads should be followed up on as soon as possible to increase the likelihood of scheduling a Demo for the Sales team. Learn more about managing Leads and Demos below.
Managing a Lead
1. When a new Lead is created in 1Stop, you’ll receive an instant notification in Cliq. To open the Lead, click View Record.
2. Upon reaching out to the new Lead, select the relevant Transition button below and follow the prompts. We’ll go into more detail on how to Gather Demo Info in the section that follows.
- Gather Demo Info: Lead is interested in scheduling a Demo.
- No Response: You were unable to reach the Lead. Select to move them to the appropriate No Response Custom View based on the number of days since first contact (e.g., Day 0-2, Day 3-5, Day 6-14, etc.).
- Contact in Future: Select to move the Lead back to "1a. Hot New Leads" at a specific date and time in the future.
- Not Qualified: Lead does not meet the company’s qualification criteria (e.g., outside of service area, does not meet product minimum, or wrong product/service).
- Lost: Lead was contacted but is no longer interested in moving forward at this time.
- Junk: Lead was invalid (e.g., spam, bot, incorrect contact information).
Gather Demo Info
1. After speaking with a Lead who is interested in scheduling a Demo, click the Gather Demo Info transition button.
2. You’ll then enter a Kiosk, which is a guided series of questions to ask the Lead before scheduling the Demo. The initial questions focus on confirming the Lead’s contact information and property details. All Kiosk questions can be customized based on your specific needs.
3. Once the Lead’s contact information and address have been entered and/or confirmed (fields marked in red are mandatory), click the Confirm Product button at the bottom.
4. Confirm the product that the Lead is interested in – in this example, Windows.
5. Enter the total quantity of doors or windows (for Windows), the replacement roof type (for Roofs), or the average electric bill (for Solar). Regardless of the product, the final question in the Kiosk helps estimate the job size to assist with Demo scheduling. When finished, click Convert and Open Opportunity.
6. After completing all of the questions in the Kiosk, you’ll be redirected to the Opportunity. The answers entered in the Kiosk will automatically populate the related fields. You can then review the information and add any additional details for fields that weren’t included in the Kiosk.

Info
Lead Quality Score - This field takes all of the information gathered and assigns a score based on a scale of 1-100 to indicate the potential value of the Lead, as outlined below. Questions/answers and point values all customizable, based on your needs.
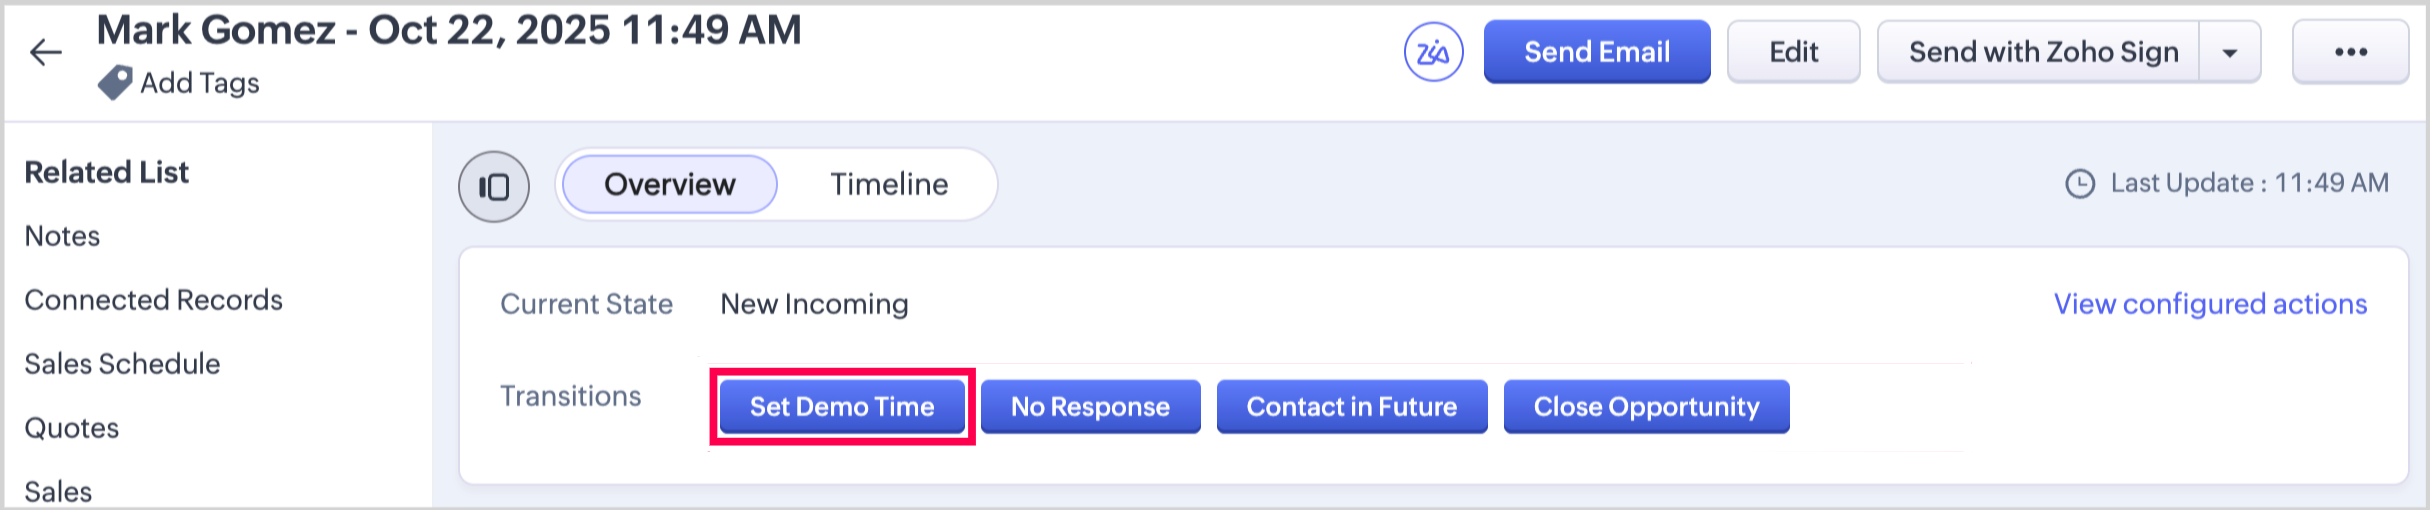
7. You are now ready to set a Demo. Select the appropriate transition to continue:
- Set Demo Time: The Lead is valid and ready for a Sales Rep to meet.
- No Response: The Lead has not responded to recent contact attempts and cannot be reached at this time.
- Contact in Future: The Lead has asked to be contacted later to schedule the Demo.
- Close Opportunity: The Lead is not valid.
Setting a Demo or Follow-Up
1. 1Stop’s Sales Scheduler makes it easy to set and edit all of your Demos and Follow-Ups, giving you a comprehensive view of your entire Sales Team’s meetings in one convenient daily view. After you’ve Gathered Demo Info for the Opportunity, click Set Demo Time.
Note: After a Sales Rep meets with a Contact, if a Follow-Up meeting is needed, follow the same procedure outlined below, but start by clicking the Set Follow-Up Time transition (not pictured below).
2. This will open the Sales Scheduler widget, pre-filtered to show tomorrow’s date and only those Sales Reps who sell the product associated with the Opportunity. The Rep Score is sorted in descending order, so your top-performing Sales Reps appear first. Any scheduled meetings or time-off entries are also displayed, so you can easily see which reps are available and when.
3. To set the Demo time, click on any open square that corresponds to the Sales Rep and the time you’d like the Demo to begin. In the example below, we’re selecting Adam North at 2:30 PM.
Note: If there are no open time slots for a specific Sales Rep, you can use one of the available Overbooking rows. The Demo can be reassigned to an actual Sales Rep later.
4. This will open a window that combines the selected Sales Rep and Demo Start Time with details from the Opportunity. The Demo Name follows this format: Product – Meeting Type – Contact Name – City – Lead Score – Job Size. Review the details to ensure the Sales Rep, Start Date & Time are correct, make any necessary adjustments to the Duration, and then click Save.
5. After saving, the Sales Scheduler will reappear, and the Demo you just set will now be visible. Note that it’s orange in color, indicating that it is in the Set state. Click the X in the top-right corner to return to the Opportunity.
6. Returning to the Opportunity, you will notice that the Current State has moved from New Incoming to Demo Set, and the Opportunity now has a Sales Schedule record associated with it.
7. Clicking on Sales Schedule in the Related List, or scrolling down the page, allows you to review the details of the Demo you just set. This includes a link to the Sales Event record, Schedule Status (Active or Canceled), Sales Rep, Meeting Type (Demo or Follow-Up), Meeting Start Time and End Times, and Product.
8. You now have additional options for the Opportunity, as highlighted below and outlined in further sections:
- Confirm Demo: Typically done the day before the Demo.
- Modify Demo Time: Change the Demo time within the same day.
- Modify Demo Date: Change the Demo to a different date.
- Cancel - Back to New Incoming: Cancel the Demo and move the Opportunity back to New Incoming.
- Cancel - Contact in Future: Cancel the Demo and set a time to reach out to the Contact in the future.
- Cancel - Close Opportunity: Cancel the Demo and close the Opportunity.
Confirming a Demo or Follow-Up
1. Confirming a Demo or Follow-Up is a straight-forward process. Simply click the Confirm Demo (or Confirm Follow-Up) Transition button.
2. Next, click Save on the Confirm Demo/Follow-Up pop-up window.
3. Once confirmed, the Opportunity State will update to Demo/Follow-Up Confirmed, and two additional transition buttons will appear — Issue Demo and Back to Set. The Back to Set option moves the Demo one step back in the process in case it was Confirmed by mistake. Issuing Demos and Follow-Ups can be done in one of two ways, as outlined in the next section.
Modifying a Demo/Follow-Up to a New Date
1. To modify the date of a Demo or Follow-Up, navigate to the associated Opportunity and click the Modify Demo Date or Modify Follow-Up Transition button.
2. Select the reason for rescheduling the Demo/Follow-Up, add any relevant Notes, and click Save. The Demo/Follow-Up will then move back to the "2a. To Be Scheduled" Custom View in the Opportunities Module.
Modifying a Single Demo/Follow-Up on the Same Date
1. To modify the time of a Demo or Follow-Up, navigate to the associated Opportunity and click the Modify Demo Time or Modify Follow-Up Time transition button.
2. This will open the Sales Scheduler widget, showing the Demo/Follow-Up for the Opportunity marked with a blue vertical bar at the beginning of the Demo/Follow-Up.
3. You can modify the time or the Sales Rep in one of two ways (note: for a Follow-Up, only the time can be changed).
- Option 1: Click and hold the mouse button in the first 30-minute time block of the Demo/Follow-Up, then drag the meeting to a new time or Sales Rep. Release the mouse at the desired time and rep. If the change creates a Conflict with another meeting, the Demo/Follow-Up will automatically move back to its original time and rep. (In the example below, Meredith Davis would need to be removed from the 10:00 AM Sales Meeting in order to reschedule this Demo to begin at 9:00 AM).
- Option 2: Click anywhere within the Demo/Follow-Up to open the pop-up window. From there, you can manually adjust the time or Sales Rep. (In this example, we'll attempt to update the Demo Start Time from 2:30 PM to 1:30 PM, which will create a Conflict with an existing Sales Meeting).
4. When clicking Save, a warning message will appear if a Conflict exists. You’ll need to either choose a time that doesn’t overlap with another meeting or remove Meredith from the conflicting Sales Meeting.
5. If you move the Demo/Follow-Up to a time and Sales Rep with no Conflict, it will successfully update on the Sales Scheduler widget. In the example below, the Demo was moved into one of the available Overbooking slots.
6. Click the red Close button in the top-right corner of the Sales Scheduler widget to return to the Opportunity. The associated Sales Event record will now display the updated Start and End Times, along with an indication that the Demo is currently marked as an Overbooking.
Modifying Multiple Demos/Follow-Ups on the Same Date
Using the Sales Scheduler Module, users can quickly view all Demos, Follow-Ups, Sales Meetings, and Sales Rep Off Time in a single daily view. This view is especially helpful for the person responsible for issuing all Demos to Sales Reps, ensuring the schedule is optimized.
1. Navigate to the Sales Scheduler. In the example below, one Demo is Confirmed (shown in yellow), while the other is Set (shown in orange). Sales Reps on the Sales Scheduler are displayed in descending Rep Score order, ensuring top-performing reps appear first.
2. Looking more closely, we can see that the Demo currently assigned to Adam North has a Lead Score of 70, and this Windows job includes 10–14 openings. The Demo currently in Overbooking has a lower Lead Score of 65 and fewer openings (5–9).
3. Before issuing either Demo, we want to ensure the highest-value Opportunities are assigned to the best Sales Reps. In this example, we’ll move the Haley Dominguez Demo to 1Stop Admin, and the Alice Clark Demo to Meredith Davis.
You can move Demos using one of two methods:
- Method 1: Click anywhere within a Demo to open a pop-up window where you can change the Sales Rep, Start Time, and Duration. Here, we’ll move the higher-value Opportunity from Adam North to 1Stop Admin, then click Save.
When the Sales Scheduler refreshes, you’ll see that the Demo has moved from Sales Rep Adam North to 1Stop Admin.
- Method 2: Use drag-and-drop to move the Alice Clark Demo from its current Overbooking slot to Meredith Davis. To do this, click and hold your mouse in the first 30-minute block of the Demo, then drag it up to the same 3:30 PM time slot under Meredith Davis.
Once you release the mouse, the Demo will update to its new Sales Rep, completing the process.
Issuing a Demo/Follow-Up
1. Demos and Follow-Ups do not appear on a Sales Rep’s calendar until they are Issued. To Issue a single Demo or Follow-Up, navigate to the associated Opportunity and click the Issue Demo or Issue Follow-Up Transition button. Sales Reps will receive an instant notification that a new Demo or Follow-Up has been assigned to them. Most users prefer to Issue all of the next day’s Demos and Follow-Ups at once, as outlined in the steps below.
2. Navigate to the Sales Scheduler. When opened, the Sales Scheduler defaults to tomorrow’s date. You can filter using any of the menus at the top of the screen if needed.
3. After ensuring that all Confirmed Demos are assigned to the correct Sales Reps, click the blue Select All button then the green Issue button to Issue them all at once. Alternatively, you can check the boxes next to individual Demos or Follow-Ups you wish to Issue and then click Issue. Note: Demos in an Overbooking row cannot be Issued until they are assigned to an actual Sales Rep.
Adding a Second Sales Rep to a Demo/Follow-Up
1. To add a Second Sales Rep to a Demo or Follow-Up, it must first be Issued. Once it's Issued, the Sales Rep 2 field will become visible on the Opportunity.
2. Select the Sales Rep who will run the Demo or Follow-Up alongside the initial Sales Rep.
3. A second Sales Event record will appear in the Related List and on the Sales Scheduler.
Canceling a Demo
1. To Cancel a Demo, select the appropriate option as outlined below:
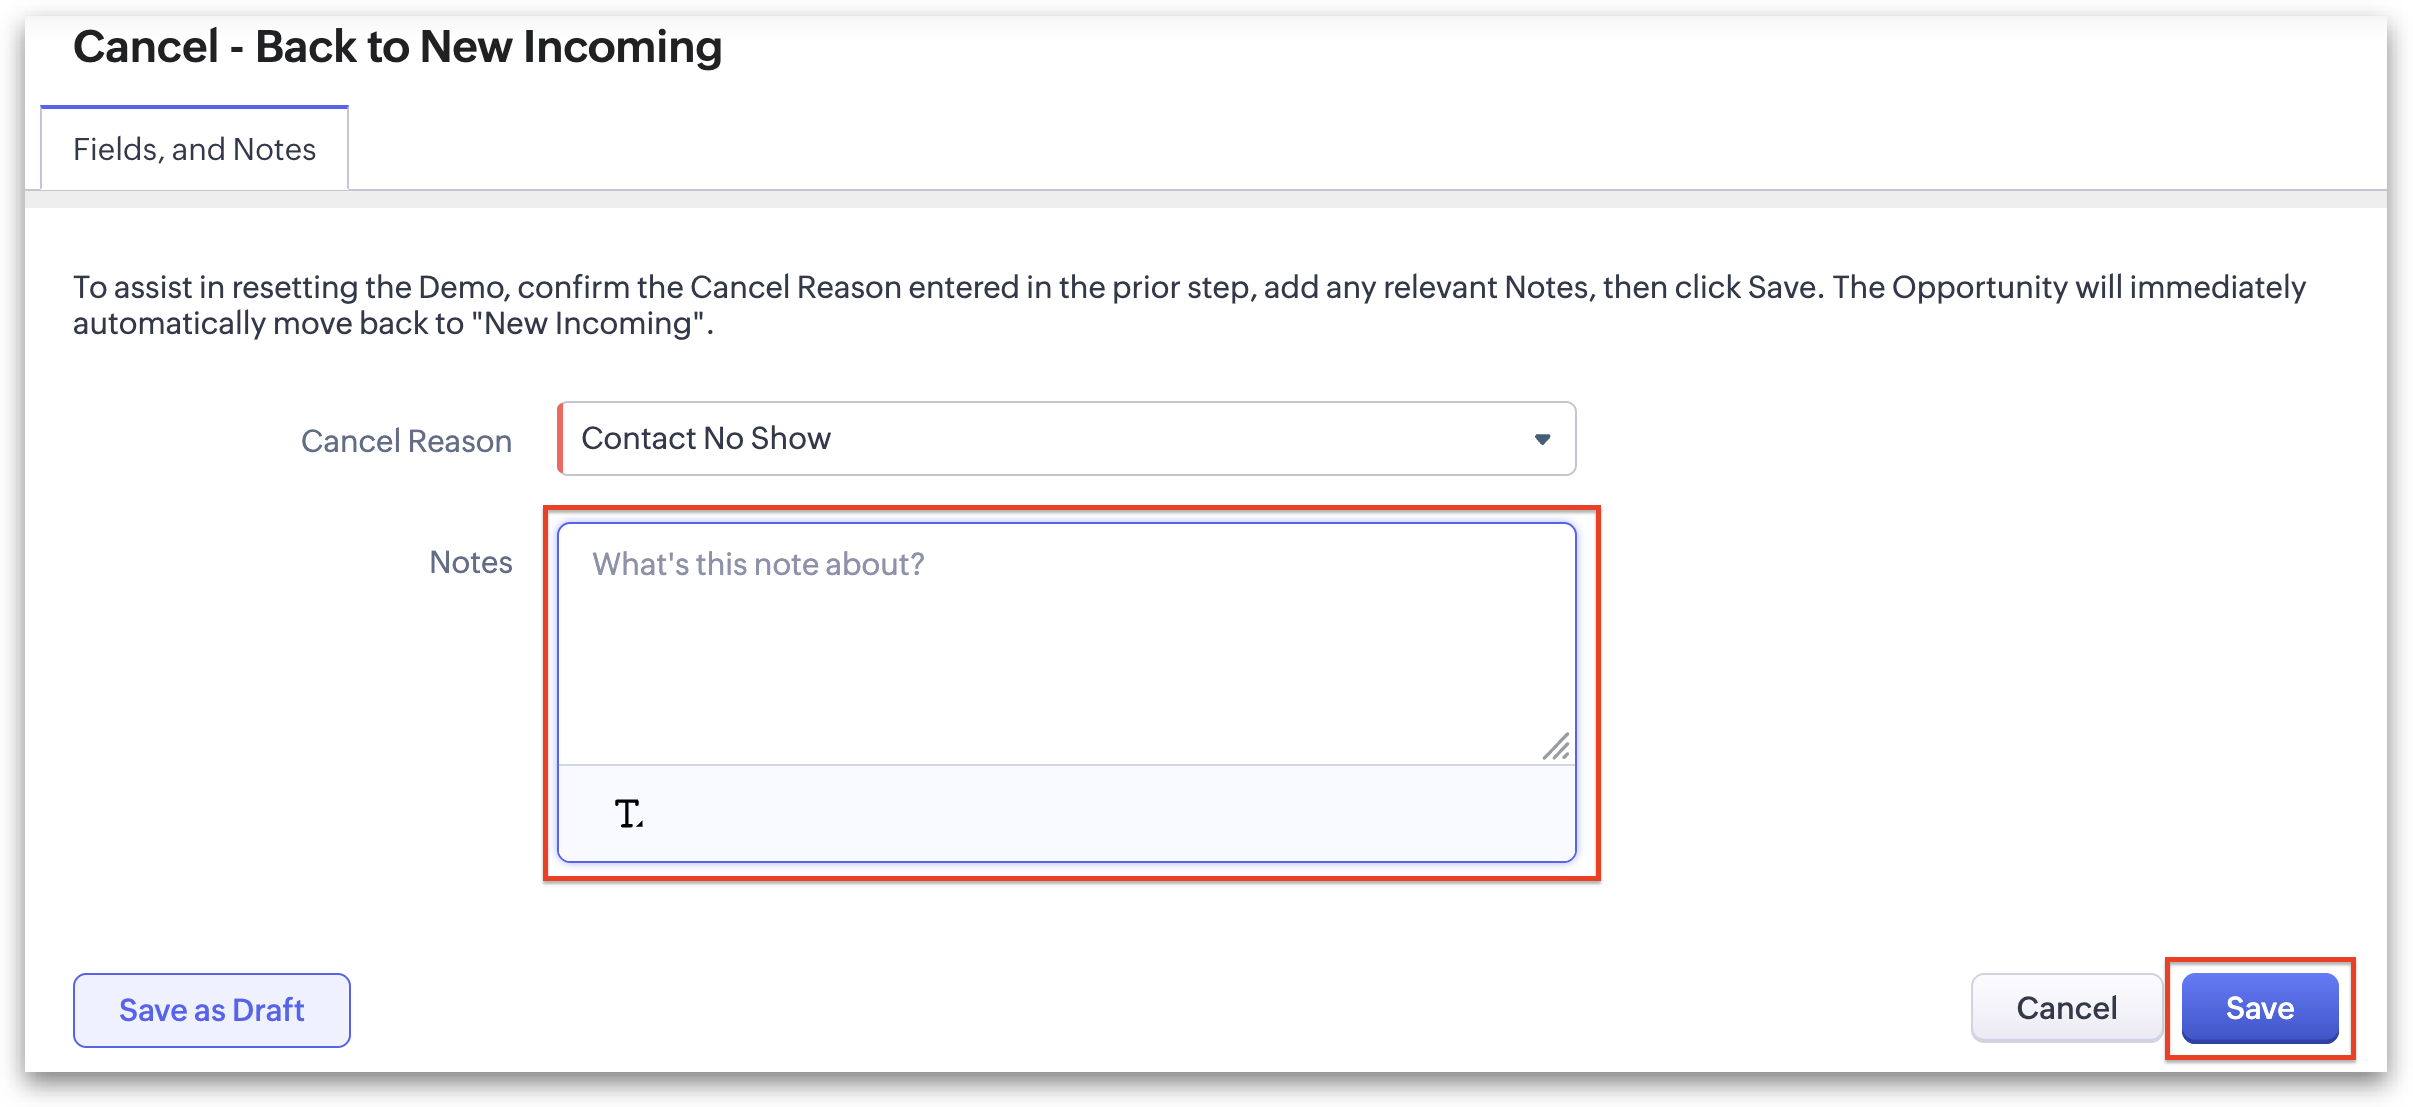
- Cancel - Back to New Incoming: Select this option if you're unable to reach the homeowner to Confirm the Demo, or if Sales Rep arrives at the Demo and the homeowner is not there. Clicking this Transition will cancel the Demo and immediately move the Opportunity back to New Incoming.
- Cancel - Contact in Future: Select this option if the homeowner asks to cancel the Demo but would like to be contacted again later. This option cancels the Demo and allows you to choose a future date and time for the Opportunity to reappear in New Incoming, serving as a reminder to follow up.
- Cancel - Close Opportunity: Select this option if the homeowner no longer wishes to be contacted. The Demo will be canceled and the Opportunity moved to Closed state.
2. Depending on the current state of the Demo (Set, Confirmed, or Issued), you may be asked whether the Sales Rep has already arrived. Select Yes or No when prompted, then click Next.
3. On the next step, choose the most appropriate cancellation reason and click Next.
4. Finally, confirm your Cancel Reason, add any relevant notes explaining why the Demo was canceled, and click Save.
Related Articles
Managing Leads, Opportunities, Appointments and Follow-ups (Draft)
Learn how to manage Leads, Opportunities, and Appointments — from the moment a new Lead enters 1Stop through scheduling, confirming, issuing, and rescheduling. It's designed to give your team a consistent, repeatable process to eliminate missed leads ...Introduction for Scheduling Teams
1Stop intuitive lead management and appointment setting process saves you time and helps you book more appointments by: Keeping all of your leads organized by status in one place, ensuring no one slips through the cracks. Making setting, assigning, ...1Stop Field Definitions
Quickly learn what each field means across all modules in 1Stop. Bonuses Module The Bonuses module in 1Stop tracks customer referrals, automatically recording details and status. It helps businesses monitor referrals, calculate rewards, and ...Offboarding Employees
Offboarding an Employee in 1Stop: Step-by-Step Guide This article walks you through the steps for offboarding a user in 1Stop. Each section expands to provide more details. 1. Update the employee record to mark the user as Resigned or Terminated. ...Anatomy of the Sales Scheduler
The Sales Scheduler is the epicenter of organization for the Scheduling Team. An overview is below, with more in-depth explanation in the individual articles of the Scheduling Teams section. Date: Displays the date user is currently viewing, which ...