Find and Merge Duplicates
Introduction
To help identify potential duplicate records, the system automatically checks newly created contact records to see if there are other contacts with the same email address or the same phone number. If the system finds other contacts with a direct match of either field, it will add the "Duplicate" tag to the new contact and also add the "Duplicate" tag to the other found Contacts that match this contact.
The system will also check for potential duplicates every time the email or phone fields are modified. If, following the modification, no additional matching contact is identified during this check, the system will remove the "Duplicate" tag if it was previously applied to the modified record.
Finding and Merging Duplicates may either be done at the individual Contact level, or done on a broader scale. In either instance, all related records that are associated to any duplicate Contact will be merged into the remaining Contact, ensuring all records that appear in the Related List of any Contacts are retained.
Find and Merge Individual Duplicates
Find and merge duplicates lets you merge duplicate records into a single record and delete the duplicates. When you are on a Contact record that has a "Duplicate" tag, you can find and merge these potential duplicate records.
1. Click on the three dots (...) in the top right-hand corner of the Contact record and select Find and Merge Duplicates.
Info
You can merge a maximum of 3 records at a time.
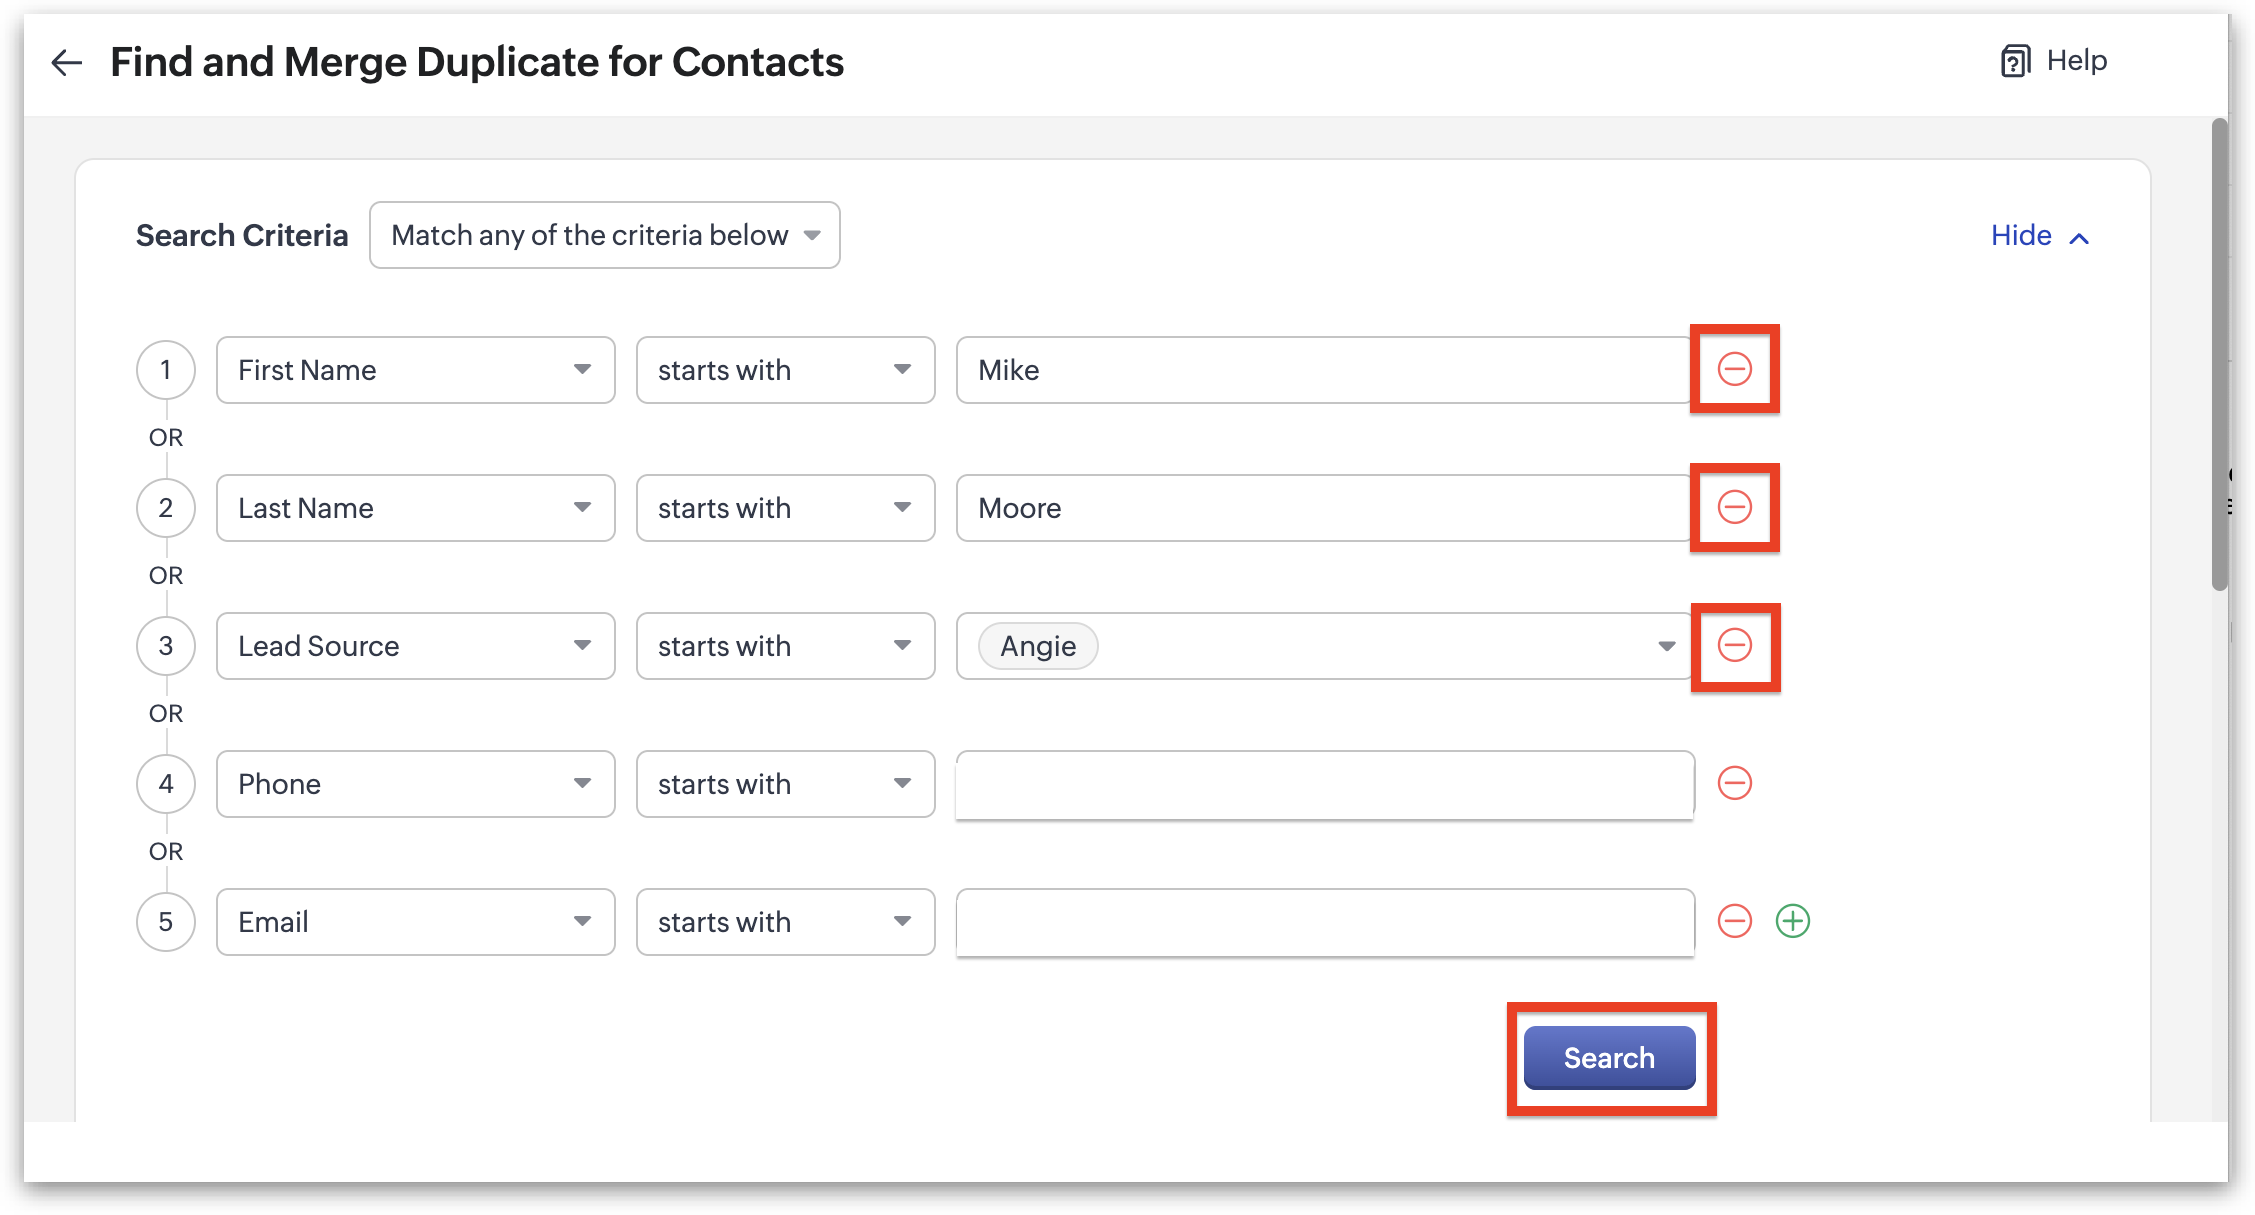
2. In the Search Criteria section, click the red-circled minus sign by all criteria/fields except Email and Phone (this identifies all records with duplicate email addresses, phone numbers, or both). Once you only have Phone and Email remaining, click Search.
3. After clicking search, all records with duplicate Email addresses and/or Phone numbers will appear in the search box. Select the contact records you would like to merge by clicking the checkboxes next to their Contact names, then click Next.
4. In the Deduplicate Contact screen, you can compare the duplicate records and choose what information the merged contact will retain from each record. The system will automatically identify the Master Record (Record 1) and default to field data in that record unless there is no data in that field for that record. If there is conflicting data between the duplicate records, it will be identified with a blue dot. The data next to the blue dot is the information that will be retained in the merged record. If you prefer to keep the data not identified with the blue dot, simply click on the radio button next to the corresponding information. We suggest you keep the majority of the information from the Contact with the "furthest along" Funnel Progress field, which are ranked in order as follows:
- Set
- Issued
- Met
- Demoed
- Sold Not Approved
- Sold Canceled
- Sold
Alert
Once the record(s) are merged to the Master Record, they will be permanently deleted, and this action cannot be undone.
Info
It is important to thoroughly scroll through all fields to confirm that there is nothing from the non-master record(s) that you would like to keep.
5. Once you have completed your review of all data fields and you are ready to merge your Contact Records, click merge in the top right-hand corner.
6. The pop-up box shown below will appear as an additional safety check. If you are ready to proceed with the merge, click the Yes, Merge Records button.
7. Once the records are merged, you will need to remove the "Duplicate" tag. Click on the pencil icon that is to the right of the tags.
8. In the edit tag mode, click on the X at the end of the tag name and then click Save. You have now successfully merged the duplicate records.
Deduplicating Mass Contacts
1. From the Contacts module, click Actions and then Deduplicate Contacts.
2. Select Email OR Phone, as this process will find all duplicate Contacts that have BOTH if you select both. We suggest to begin with Phone first, then repeat this process with Email. After making your selection, click Find And Merge Duplicates.
3. On the next screen, the system provides a description for how Duplicate records will be merged. If all of the information in all fields are the same, the records will be merged automatically. If any fields have different information, then you will be asked to manually review each to choose which field you would like to keep. Click Yes, proceed to continue.
4. The deduplication process will then run, and once complete you will receive a notification advising it is complete. You then have two choices - you may either click "Do it later" which will email you a link of all the duplicates which is valid for 72 hours, or you may click Resolve Now.
5. Clicking Resolve Now will show you all of the duplicate Contacts found. Click "View" next to each to review the differences in fields between the two records.
6. In the Deduplicate Contact screen, you can compare the duplicate records and choose what information the merged contact will retain from each record. The system will automatically identify the Master Record (Record 1) and default to field data in that record unless there is no data in that field for that record. If there is conflicting data between the duplicate records, it will be identified with a blue dot. The data next to the blue dot is the information that will be retained in the merged record. If you prefer to keep the data not identified with the blue dot, simply click on the radio button next to the corresponding information. We suggest you keep the majority of the information from the Contact with the "furthest along" Funnel Progress field, which are ranked in order as follows:
- Set
- Issued
- Met
- Demoed
- Sold Not Approved
- Sold Canceled
- Sold
Alert
Once the record(s) are merged to the Master Record, they will be permanently deleted, and this action cannot be undone.
Info
It is important to thoroughly scroll through all fields to confirm that there is nothing from the non-master record(s) that you would like to keep.
7. Once you have completed your review of all data fields and you are ready to merge your Contact Records, click merge in the top right-hand corner.
8. The pop-up box shown below will appear as an additional safety check. If you are ready to proceed with the merge, click the Yes, Merge Records button.
9. You will then be returned to the Deduplicate Contacts screen where you can click View on the next set of Contact records you would like to review.
Related Articles
Chart of Accounts
The Chart of Accounts (COA) module in 1Stop CRM is where you manage the financial accounts your company uses. It’s designed to reflect your general ledger structure, giving you quick visibility into the accounts tied to things like invoices, ...Getting Around in 1Stop
Navigation In this article we'll go over the global navigation elements of 1StopInstall, helping you navigate the system to find what you are looking for. 1. Main Navigation Bar - Always present at the top of the page, the Main Navigation Bar is ...Sync With Google
Introduction If you rely on Google Calendar, you can seamlessly synchronize your calendar events between 1Stop and Google. With the 1Stop Mail Add-on (see Configuring Gmail), you can even integrate your Gmail account directly into 1Stop, ensuring ...Quoting
Quoting Click on a tab below to learn how to create, edit, and share a Quote with a Contact for them to sign. Create a Quote 1. From the Opportunity record of the Demo that you wish to create a Quote for, hover over Quotes in the Related List and ...How to Search Records
1Stop's robust search capabilities allow you to find crucial data about your business quickly. Whether you're searching for a specific Contact, Sale, Job, or any other Record, our search puts the information you need at your fingertips. Search ...