Quoting
Quoting
Click on a tab below to learn how to create, edit, and share a Quote with a Contact for them to sign.
Create a Quote
1. From the Opportunity record of the Demo that you wish to create a Quote for, hover over Quotes in the Related List and click the + sign.
2. Within the Quote Information section, all relevant fields will be auto populated.
3. If the Install will require HOA Approval, the following section will appear. Complete the appropriate fields.
4. If the Contact is going to use Financing, the following section will appear. Complete the appropriate fields, clicking  for an explanation.
5. Complete the Payment Schedule section. These calculations will be used later in the Quote process.
6. Within the Quoted Items section, add the first Product being quoted using one of the three following methods:
A. Search: Enter any terms related to the Product you are searching for and matching results will appear. Click the desired Product.
B. Product Selector: Click the filing cabinet icon which will open the Choose Product window. Find the Product using the search box to narrow the items listed, or use the scroll arrows to find what you are looking for.
C. Guided Selling: Click the Add Via Guided Selling button and select the Product category. The category window will open, where you may use the various drop downs and filters to narrow your search. Clicking Submit will open a new window with all the matching Products. Select the appropriate item and click the Add Selected Item to Quoted Items button.
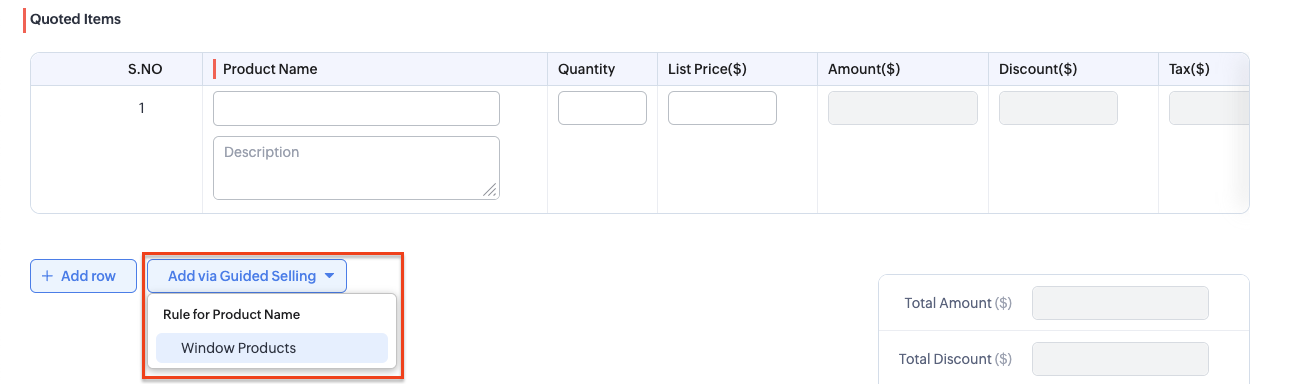
7. After selecting a Product using any of the methods above, that Product will now appear. To the left of the Product Name, you may Re-order the rows, Clone the row, or Delete the row. In each row the following fields may be edited:
- Product Details: directly under the Product Name, add the room the Product will be installed in, the configuration tint and grid information.
- Quantity: adjust how many of that specific Product that will be included in the Quote.
- List Price: adjust the price of that specific Product, if desired.
- Discount: clicking the pencil icon will allow you to enter either a Percentage discount or a flat Direct Price Reduction discount. Both discounts will be applied to this specific row only. If you wish to apply a discount to the entire quote, add a new row and for the Product select "Discount" and apply the amount you wish to discount the Quote by in the Discount($) field.
8. Once you have entered all of the Products for this Quote, click Save in the top right corner.
9. Upon clicking Save, you will be taken back to the Opportunity and the screen will scroll down to your new Quote, and the Related List will show the number of Quotes created for this Opportunity. Click on the blue Subject to open the Quote to review it, edit it or Send for Signature.
Edit a Quote
If you need to edit a Quote, please follow these steps:

Note
If the Quote has already been sent to your customer, you will need to recall and resend the updated Quote.
1. Go to the Quotes module and select the Quote you want to edit.
2. In the Quote record, click the Edit button located at the top right.
3. Make the necessary changes and click Save.
Send a Quote for Digital Signature
Once you have reviewed all fields and previewed the quote for accuracy, you can send it for digital signature.
1. From the Quote record you want to send, click the Send with Zoho Sign button.
2. In the pop-up window, click Use Template.
3. Select CRM Template.
4. Choose the Quote template you want to send, then click Create.
5. You will see the Quote listed under the Document section.
- To rename the Quote, click the pencil icon under the quote name.
- You can also add additional documents or templates if needed.
- The primary recipient will already be listed. To add more recipients, click the + Add Recipients button and enter their name and email address.
6. In the More Settings section, review and adjust any fields as needed. Add a note to include with the email, then click Next.
7. In the pop-up window, confirm all details. You can also click Add Me to receive a copy, then click Continue.
8. You’ll see a preview of the Quote and the recipient list. If everything looks good, click Send.
9. Verify the number of fields that need to be filled out (in this case, it is 4), then click Confirm.
10. Once the document is sent, you’ll receive a confirmation. Click Done to finish.
Note
To view the Quote after it’s been sent for signature, click ZohoSign Documents in the Related List, then select the Quote from the list.
Recall a Quote Sent for Signature
If you’ve sent a Quote for signature using Zoho Sign and need to recall or cancel it before it’s signed, follow the steps below to properly withdraw the document. This can be helpful if the Quote was sent in error, needs changes, or was sent to the wrong recipient.
Note
- You can only recall documents that have not yet been signed.
- Once recalled, the document cannot be reactivated - it must be re-sent if needed.
1. Navigate to the Quote you originally sent for signature.
2. From the Related List, click ZohoSign Documents, then select the Quote you want to recall.
3. Click Open in ZohoSign in the upper right corner.
4. In the pop-up window, click the three dots, and then select Recall.
5. Enter the reason for recalling the Quote, then click Recall.
The document status will update to "recalled" in both the 1Stop CRM and Zoho Sign.